
First of all - thank you and congratulations on taking your first steps towards building your own self-made sensor. Your important contribution to citizen science will bring valuable data to scientists all over the world! We hope that you find this tutorial and simple, as we have tried to make each step as easy-to-follow as possible. Should you have any questions, do not hesitate to contact us at the contact details!
What do you need to buy?
Total cost 1345 SEK | Could be less if you have materials at home
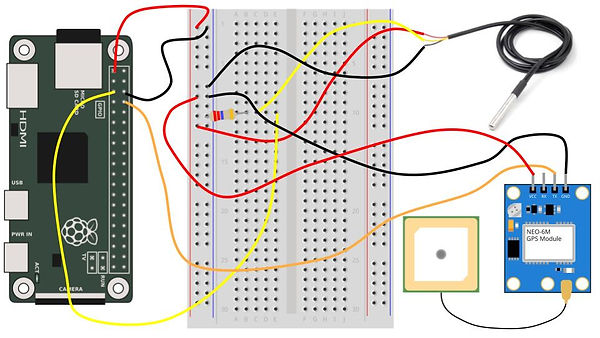
Connecting the hardware
Starting the Raspberry Pi
Part 1
-
Download “Rasberry Pi imager” on your computer https://www.raspberrypi.com/software/
-
Plug in the SD card to your computer
-
Open Rasberry Pi imager and choose “Rasberry Pi OS (32Bit)” as operating system and your sd card for storage
-
Press the “Write” button
Part 2
-
Plug in the SD card, HDMI, keyboard and mouse to Rasberry Pi and turn on your monitor
-
When you start the raspberry for the first time the “Welcome to Rasberry Pi” window pops up.
-
Select your country, language and timezone
-
Create a user with username=datacollector and password
-
Setup screen so the desktop completely fills the monitor
-
Connect it to wireless internet
-
Press “Restart
Changing the settings
Part 1
1. Open the terminal in your Raspberry Pi
2. Write the following line and press enter
sudo raspi-config
3. Select “Interfacing options”
4. Press P7 “1-wire”
5. Select “Yes”
6. Press “Ok”
Part 2
1. Return to terminal in the Raspberry Pi
2. Enter the following line of code
sudo nano /boot/config.txt
3. Scroll to the bottom of the page
4. Copy and insert the following lines
dtoverlay=w1-gpio, gpiopin=4
dtparam=spi=on
dtoverlay=pi3-disable-bt
core_freq=250
enable_uart=1
force_turbo=1
5. Press Control +X
6. Select “Yes”
7. Press Enter
Part 3
1. Enter the following line in the terminal
sudo nano /boot/cmdline.txt
2. Remove everything on the line and replace it with this
dwc_otg.lpm_enable=0 console=tty1 root=/dev/mmcblk0p2 rootfstype=ext4 elevator=deadline fsck.repair=yes rootwait quiet splash plymouth.ignore-serial-consoles
Part 4
1. Enter the following lines in the terminal one by one
sudo pip3 install w1thermsensor
sudo pip3 install pynmea2
2. Reboot the Raspberry Pi by entering the line below. Wait for the Raspberry to restart. This could take 2-3 minutes
sudo reboot

If this is the output generated enter the following lines into the terminal
sudo systemctl stop serial-getty@ttyAMA0.service
sudo systemctl disable serial-getty@ttyAMA0.service

If the output instead looks like this, the lines below should be inserted
sudo systemctl stop serial-getty@ttyS0.service
sudo systemctl disable serial-getty@ttyS0.service
Part 5
Enter the line below in the terminal
ls -l /dev
This could generate two different outputs that will be dealt with differently.
Coding the sensor
Create a new file on your desktop with the name “run.py”
Copy and paste the following program into “run.py”. If you wish to participate in our marina competition: change subject and body under “send_mail()” to ‘Data from [name of your marina]’. This will enable us to track your progress and for you to compete against other data collectors.
import time
from w1thermsensor import W1ThermSensor
from w1thermsensor import errors
import csv
import urllib.request
from email.message import EmailMessage
import ssl
import smtplib
from email.mime.text import MIMEText
from email.mime.multipart import MIMEMultipart
from email.mime.base import MIMEBase
from email import encoders
import os
import serial
import pynmea2
import string
def check_connection(host='http://google.com'):
try:
urllib.request.urlopen(host)
print('Connected!')
return True
except:
print('Offline!')
return False
def main_loop(sensor):
time.sleep(20)
if check_connection():
send_mail()
else:
collect_data(sensor)
def send_mail():
filename = '/home/datacollector/Desktop/data.csv'
attachment = open(filename, 'rb')
attachment_package = MIMEBase('application', 'octet-stream')
attachment_package.set_payload((attachment).read())
encoders.encode_base64(attachment_package)
attachment_package.add_header('Content-Disposition', 'attachment; filename = ' + filename)
email_sender = 'oceansentinel.user@gmail.com'
email_password = 'shrnzgkefspeutnp'
email_receiver = 'oceansentinel.data@gmail.com'
subject = 'Data from [insert name of marina]'
body = 'Data from [insert name of marina]'
em = MIMEMultipart()
em['From'] = email_sender
em['To'] = email_receiver
em['Subject'] = subject
em.attach(MIMEText(body, 'plain'))
em.attach(attachment_package)
context = ssl.create_default_context()
with smtplib.SMTP_SSL('smtp.gmail.com', 465, context=context) as smtp:
smtp.login(email_sender, email_password)
smtp.sendmail(email_sender, email_receiver, em.as_string())
os.remove('/home/datacollector/Desktop/data.csv')
print('Email sent!')
def collect_data(sensor):
time.sleep(30)
while True:
time.sleep(20)
port = "/dev/ttyAMA0"
ser = serial.Serial(port, baudrate=9600, timeout=0.5)
dataout = pynmea2.NMEAStreamReader()
newdata = ser.readline()
newdata_str = newdata.decode('ISO-8859-1')
temp = sensor.get_temperature()
timestamp = time.strftime('%Y-%m-%d %H:%M:%S')
if newdata_str[0:6] == "$GPRMC":
newmsg = pynmea2.parse(newdata_str)
lat = newmsg.latitude
lon = newmsg.longitude
with open('/home/datacollector/Desktop/data.csv', 'a', newline='') as file:
writer = csv.writer(file)
data = [temp, lat, lon, timestamp]
writer.writerow(data)
try:
sensor = W1ThermSensor()
main_loop(sensor)
except errors.SensorNotReadyError:
print('Sensor is not ready')
pass
except errors.NoSensorFoundError:
print('Sensor is not found')
pass
Starting the sensor and program on shutdown
1. Open the terminal and create a new systemd service unit file using a text editor
sudo nano /etc/systemd/system/my_shutdown_program.service
2. Add the following to the file
[Unit] Description=My Shutdown Program
DefaultDependencies=no
Before=shutdown.target
[Service]
Type=oneshot
ExecStart=/usr/bin/python3 /path/to/my_program.py
RemainAfterExit=true
[Install]
WantedBy=multi-user.target
3. Save the file by pressing “Ctrl + x”, then y and finally “Enter” to confirm the file name
4. Enable the service to run at shutdown
sudo systemctl enable my_shutdown_program.service
5.Reboot your Raspberry Pi to apply the changes
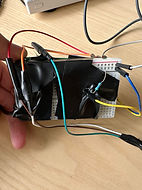
Building the capsule
There are a lot of ways that you can build the capsule so feel free to do it another way if you have access to different materials. The important thing is that the capsule is totally waterproof and that it is easy to access the powerbank so you can charge and turn on the Raspberry Pi. The tutorial below describes our procedure, but is only meant to give some inspiration for your construction!
Tape the Bread Board to your Raspberry Pi so it becomes one unit and tape all the connections to prevent them for loosening

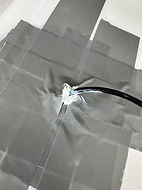
Drill a 6mm hole at the bottom and thread the temperature sensor through 40 cm. Open the adhesive sealant and apply liberally around both sides of the hole

Use tape to further seal the hole and repeat this process with more layers